Search for the Instagram Reel format and nearly every result gives you the same three numbers: 1080 x 1920, 9:16, MP4. Follow that advice and you can still end up with a file the app accepts, a scheduling dashboard rejects, and the recommendation system ignores. The popular answer isn't wrong. It's one route's answer to a question that has three answers.
Reels have an in-app spec, an API spec, and a discovery threshold. They don't fully agree. The app lets you create a 20-minute Reel; the publishing API caps uploads at 15 minutes; and Instagram says anything past 3 minutes won't be recommended to new audiences. Those three facts decide different things, and confusing them is why creators spend an afternoon re-exporting.
Here's the working reference I use, split by publishing route, followed by the export rule that satisfies all three.
Table of Contents
- Instagram Reel Specs at a Glance
- Why 9:16 Portrait Is the Standard
- Keeping Text and Faces Inside the Safe Zone
- Creation Versus Discovery
- File Size and Bitrate Budget
- Choosing In-App, Scheduled or API Publishing
- Export and Schedule a Reel That Passes
- Fixing Common Reel Format Errors
Instagram Reel Specs at a Glance
The same Reel can pass an in-app upload and fail through a scheduler. The two publishing routes have different limits, so use the API requirements when preparing a file for scheduled publishing.
| Setting | In-app upload | API or scheduled publishing | Recommended master |
|---|---|---|---|
| Aspect ratio | 1.91:1 to 9:16 | 1.91:1 to 9:16 | 9:16 (1080 x 1920 px) |
| Minimum resolution | 720 px | 720 px | 1080 x 1920 px |
| Frame rate | At least 30 FPS | 23 to 60 FPS | 30 FPS |
| Duration | Up to 20 minutes | 3 seconds to 15 minutes | Under 3 minutes for broad reach |
| File size | Not published | Up to 300 MB | Under 300 MB |
| Container | Not published | MP4 or MOV | MP4 |
| Video codec | Not published | H.264 or HEVC | H.264 |
| Video bitrate | Not published | Up to 25 Mbps | At or below 25 Mbps |
| Audio | Not published | AAC at 128 kbps | AAC at 128 kbps |
The API column lists the file limits in Instagram's Graph API media reference. The in-app column covers the limits available for consumer uploads; details such as container, codec, bitrate, and file size are not specified there. Where the routes differ, prepare the file for the stricter API limits if you plan to schedule it.
How to read the two columns
A scheduled post is sent to Instagram through its publishing API, so use the API column to check whether the file will be accepted. The 20-minute in-app allowance does not apply to that route. Duration also affects discovery: Instagram's three-minute threshold is a format rule for recommendations to new audiences, not a creative preference.
The recommended master gives you one practical export target across routes: 1080 x 1920 px, H.264 MP4, AAC audio at 128 kbps, under 300 MB. For campaign planning beyond the export itself, SME video strategy from Carlos Alba Media offers a broader view of vertical short-form as part of a video programme.
The one rule to apply today: export a single master at 1080 x 1920 px in H.264 MP4 with AAC audio at 128 kbps, keep it under 300 MB, and keep it under 3 minutes if discovery by new audiences matters.
That target fits the published API limits while keeping the Reel within the discovery threshold.
Why 9:16 Portrait Is the Standard
Reels are a vertical, mobile-first format, and that's documented rather than assumed. Instagram's technical documentation allows uploaded Reels with aspect ratios from 1.91:1 through 9:16, but recommends 9:16 to fill the smartphone screen and avoid cropping or empty space, with a documented floor of 720 pixels and 30 frames per second (Instagram Graph API media reference).
The reason is arithmetic. A 16:9 master played in a vertical player sits in a horizontal slot in the middle of the screen, with bars above and below it. A 1:1 square leaves empty space top and bottom. A 9:16 canvas uses the whole display, so your subject is rendered at the largest size the phone can show.
What each framing costs you
- Wide 16:9: letterboxed with dead space above and below, and the viewer's thumb covers the lower third of whatever does show.
- Square 1:1: accepted, but it wastes roughly the top and bottom quarters of the screen and reads as a repurposed feed post.
- Portrait 9:16: fills the frame, keeps captions legible at arm's length, and matches how the app is held.
The quality floor of 720 px and 30 FPS applies even when a wide-format file is accepted. Acceptance is not the same as looking good, and a low-resolution file gets punished twice: once by the encoder and again by the viewer's eyes.
Viewing is daily and phone-first. In 2025, 95% of surveyed Instagram users in India reported watching Reels daily, according to a Meta-commissioned study of more than 3,500 respondents in 33 cities (IANS). Daily portrait viewing is exactly why the vertical canvas wins.
The production consequence matters more than the spec. Compose vertically from the start. Cropping a horizontal clip into 9:16 after the fact removes the sides of the frame, and the sides are usually where the second person, the product, or the on-screen context lives. If you shoot wide for safety, frame your subject inside a central vertical column so the crop is already decided on set.
Hold the phone in portrait, play the finished export, and ask one question: does the subject and the text fill the screen without bars or cut-off edges? If not, the canvas is wrong, not the export settings.
For the wider set of canvas sizes across platforms, this full breakdown of vertical video dimensions is worth bookmarking before you set up templates.
Keeping Text and Faces Inside the Safe Zone
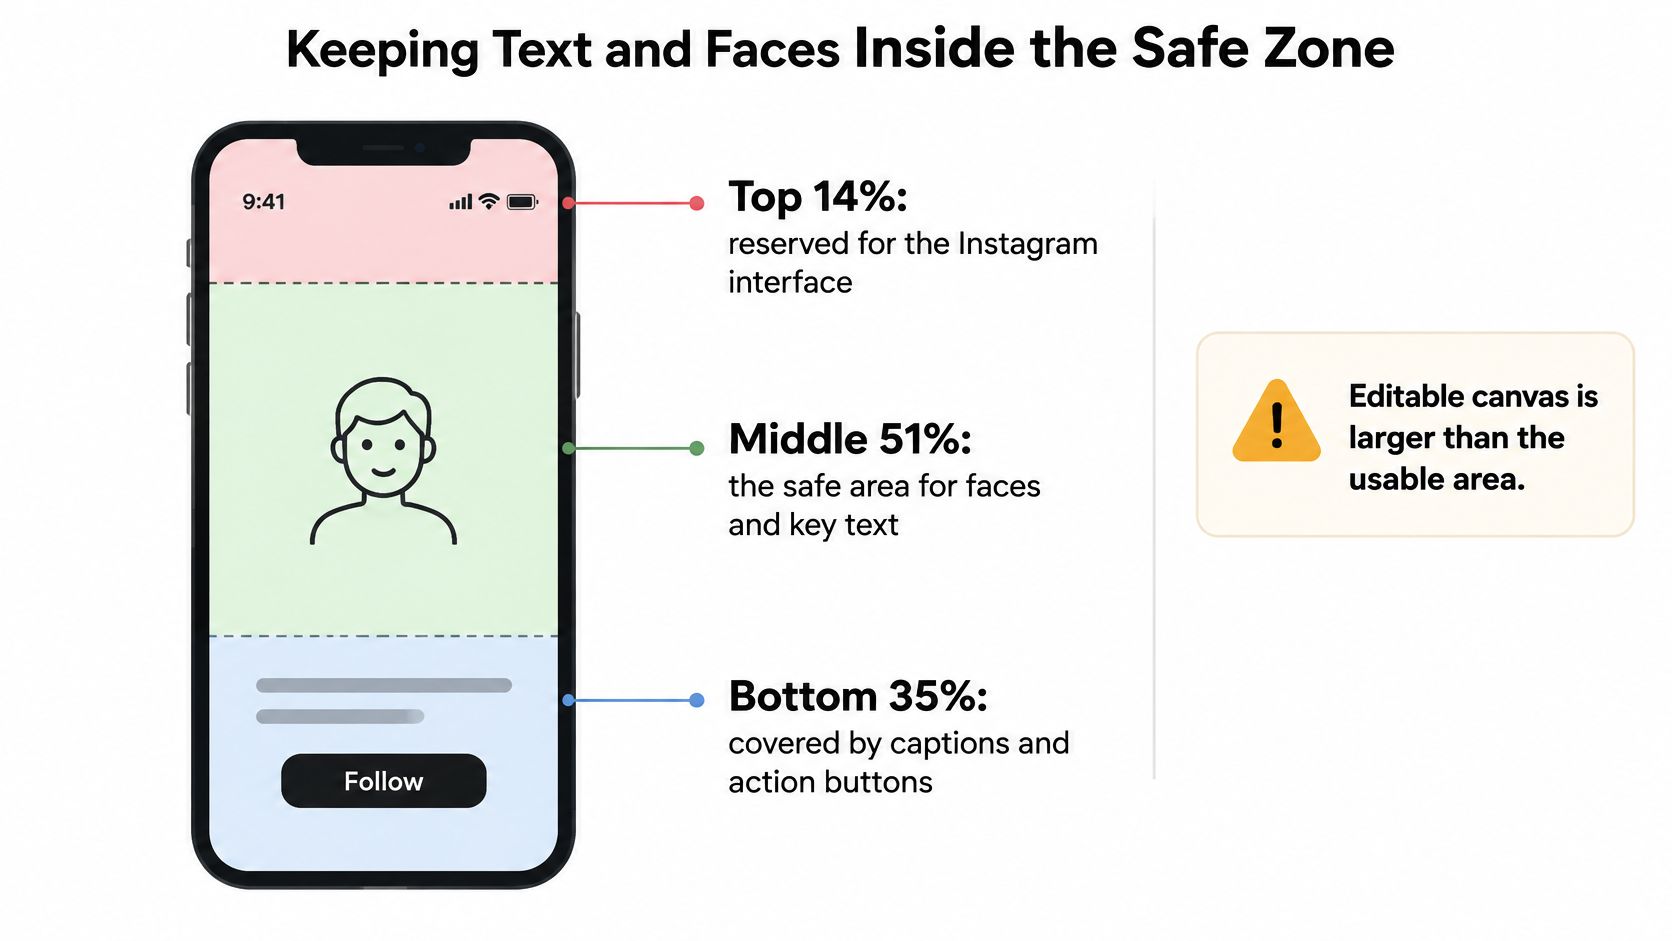
Instagram publishes no exact safe-zone measurements. Common vertical-video practice keeps roughly the top 14%, bottom 35%, and 6% along each side clear of text and faces. These are working margins, not platform guarantees. On a 1080 × 1920 canvas, they leave a narrower area for key content than the full frame suggests.
| Zone | Approx. share of frame | Pixel band (1080 × 1920) | What to place there |
|---|---|---|---|
| Top band | About 14% | Top 269 px | Background; keep captions and logos out |
| Bottom band | About 35% | Bottom 672 px | Keep captions, handles, and calls to action out |
| Left and right margins | About 6% each | About 65 px each | Keep faces and text clear; allow extra space on the right |
| Central safe area | Remaining frame | About 950 × 979 px after side margins | Faces, logos, key text, and calls to action |
Placement rules that survive the interface
- Keep faces in the upper-middle. Place eyes inside the central area, slightly above its midpoint, away from profile details and the caption block.
- Raise subtitles. Keep burned-in captions above the bottom 672 px, where interface controls can obscure them.
- Keep handles and logos below the top band. Leave the upper area clear rather than placing important details where app controls may overlap.
- Allow extra room on the right. Engagement controls occupy that side, so keep text farther in than the 65 px margin alone suggests.
Treat these bands as a practical starting point, not an exact mask. Interface layouts and design contexts vary, so check the finished Reel in the app before publishing. The same overlay considerations apply to Stories; the Instagram Story format specs cover that placement context.
Creation Versus Discovery
The most popular Reel advice is to use the longest video Instagram will take. That confuses a permission with an advantage. Instagram's consumer guidance says users can create and edit Reels up to 20 minutes, while Reels longer than 3 minutes are not recommended to new audiences (Instagram Reels). One number is about what the editor permits. The other is about who gets shown the result.
That gap is the single most expensive misunderstanding in Reel production, because it's invisible. Nothing in the upload flow warns you. The file publishes, the video plays, and the reach curve just flattens.
The format itself does reward short vertical video. In 2025, Reels were reported to generate 22% more interactions than standard Instagram video posts (Proxidize Instagram statistics). That's evidence for the format, not for a specific runtime, and it doesn't mean length causes the lift. It means the short vertical container is doing work you can lose by treating Reels as a video host.
The longest Reel is rarely the best performing one
Take a two-minute forty-second clip. It sits inside the discovery window and every second of it is eligible for recommendation. Now take an eight-minute tutorial on the same topic. The better play is a two to three minute cut that carries the strongest single moment, with the full version living wherever long video belongs. You keep the depth and you keep the distribution.
Length is a distribution decision, not a creative one. The 3-minute line is where recommendations stop, so treat it as a format rule and design around it.
Then apply the file arithmetic, because the same clip can fail on size while passing on duration. At the maximum 25 Mbps, a two-minute forty-second export is about 500 MB and fails the 300 MB ceiling. Keep total bitrate near 12 Mbps at that length and you land at roughly 240 MB, which leaves headroom and still looks clean at 1080 x 1920.
Front-load the hook. The first few seconds are what decide whether the viewer stays inside the window the recommendation system cares about. Whatever the payoff is, move it earlier than feels comfortable.
Deciding where the remainder of a long piece belongs is a format-mix question, and the Reels vs Stories comparison covers which surface suits an edit that doesn't fit the discovery window.
File Size and Bitrate Budget
The 25 Mbps cap is a ceiling, not a target. The binding constraint is 300 MB across the length of the clip, and that turns into a total bitrate budget which falls as the clip gets longer. Do the conversion once: 300 MB is 2,400 megabits.
| Clip length | Total bitrate the 300 MB limit allows |
|---|---|
| 1 minute | 25 Mbps cap applies (40 Mbps would be needed) |
| 2 minutes | About 20 Mbps |
| 3 minutes | About 13 Mbps |
| 5 minutes | About 8 Mbps |
| 15 minutes | About 2.7 Mbps |
Two things follow. A three-minute Reel can carry about 13 Mbps in total, so aim for 10 to 12 Mbps to leave headroom. And AAC audio at 128 kbps consumes about 0.13 Mbps of that same budget, so subtract it before you set the video figure.
Name the cutoff clearly: at 25 Mbps, a file reaches 300 MB at about 96 seconds. Any clip longer than that needs a lower bitrate, whether or not the API cap technically applies to the route you're using.
At 15 minutes you're down to roughly 2.7 Mbps, which is soft on a phone screen and visibly blocky in motion. The honest answer at that length is that the size limit is telling you something about the length.
Budget rule: when a clip is over budget, lower the bitrate first if the picture still holds at 720 px or above. If it doesn't hold, shorten the clip. Those are the only two moves.
These figures are derived from the 300 MB API limit and real encoders vary in efficiency. Check the exported file size in Finder or Explorer rather than trusting the target.
Choosing In-App, Scheduled or API Publishing
One Reel can leave your hands by more than one door, and each door has its own constraints. Choose the route first, then export to the stricter spec. Doing it the other way round is how a file gets re-exported three times.
- In-app upload. Posting from the Instagram app accepts aspect ratios from 1.91:1 to 9:16, asks for at least 720 px and 30 FPS, and allows creation up to 20 minutes, while the discovery threshold sits at 3. Use this route for phone-native edits, trends, and one-off posts where you're already holding the phone.
- API publishing. The Graph API accepts 3 seconds to 15 minutes, up to 300 MB, 23 to 60 FPS, MP4 or MOV containers, and H.264 or HEVC video. Use it for batch scheduling and anything that runs on a calendar.
- Publishing through a scheduling dashboard. Tools that publish through official APIs, which is how SleekPost sends posts and media to Instagram, deliver the file in the API form. The API column is the one that decides whether your upload is accepted.
The decision rule is short. A file built to the API column works on both routes. A 20-minute file works only in-app, and it sits entirely outside the discovery threshold, so it's the worst of both.
One export, both routes
Say you cut a 45-second Reel. Export on a 1080 x 1920 canvas, H.264 MP4, AAC at 128 kbps, constant 30 FPS, and the file size lands far under the ceiling. That single master posts from the phone today and queues for next Tuesday without a second render.
Keep the asset library honest on this point. Where the first table marks a value as not published for a route, leave the field unfilled in your preset sheet instead of guessing a number. An empty cell prompts a real check. A wrong number gets trusted for a year.
For the mechanics of queuing video rather than posting live, this guide to scheduling videos on Instagram walks through what a scheduler can and can't do on your behalf.
Export and Schedule a Reel That Passes
A Reel can meet Instagram's in-app limits and still fail when sent through a scheduler. Export for the publishing route you plan to use, then check the finished file before you queue it. Set the canvas before editing; changing it later can shift crops, text and keyframes.
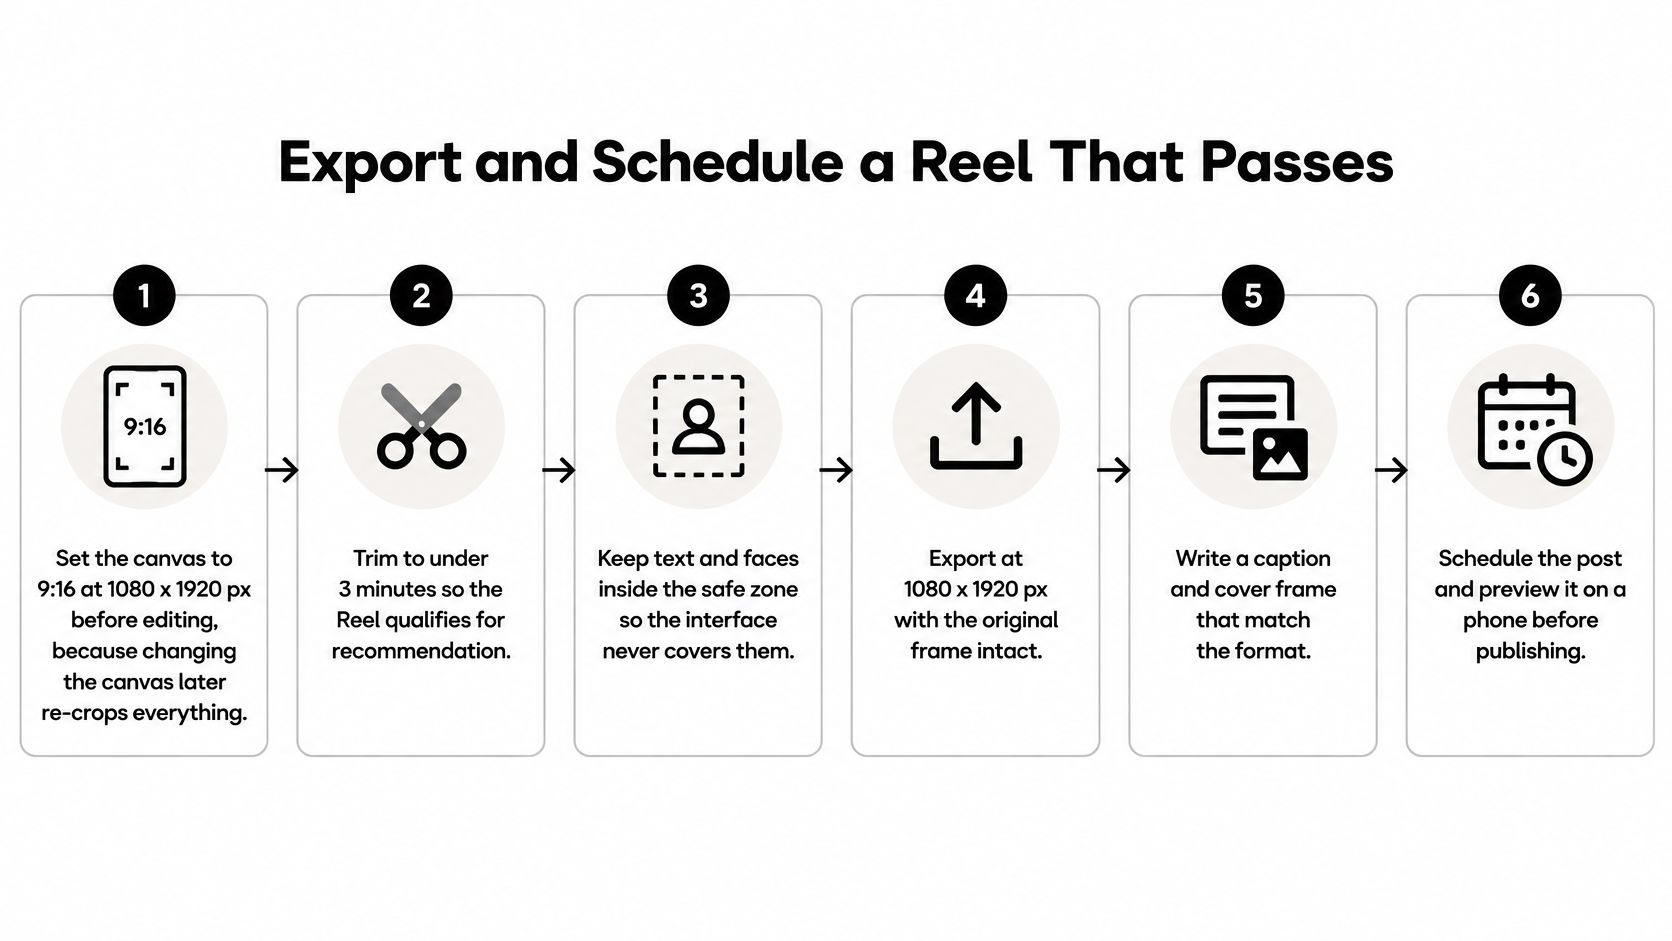
- Set a 9:16 canvas at 1080 x 1920 px. Build the edit at this size from the start so clips and graphics stay framed as intended.
- Choose the duration for the Reel's purpose. Keep it at 3 minutes or less if discovery is a priority. Treat that threshold as a format rule, not a creative preference.
- Set a constant 30 FPS. It falls within the API's 23 to 60 FPS range. Constant frame rate also avoids a common source of audio sync problems.
- Export as MP4 with H.264 video. Set the bitrate according to the clip's duration and file-size budget, staying at or below 25 Mbps.
- Set audio to AAC at 128 kbps. Play the export after rendering to confirm the audio is present and in sync.
- Check the file size against the 300 MB API limit. A file that exceeds it may not work for scheduled publishing, even if you intend to post in-app.
- Review the export on a phone in portrait. Check captions and faces against the interface overlays, especially near the top and bottom of the frame.
- Check the scheduler's preview and settings. Confirm the duration, dimensions, codec and frame rate, select Reel rather than feed video, and make sure the preview keeps text within the safe zone.
Choose audio that suits the cut, then listen to the exported file on a phone before scheduling. If you want a custom music bed, original AI beats for short Reels are one option to explore.
Once the export passes these checks, schedule it and review the final preview. The format settings can prevent file and playback problems; they cannot guarantee reach.
Fixing Common Reel Format Errors
Black bars above and below a Reel usually mean the source is square or wide. Re-export it on a 9:16 canvas at 1080 × 1920 px. The framing changes; the edit may not need to.
| Symptom | Likely cause | Fix |
|---|---|---|
| Black bars above and below the video | Landscape or square master | Re-export at 9:16, 1080 × 1920 px |
| Faces or text hidden by the interface | Content outside the safe zone | Move faces and text into the central band, about 950 × 979 px on a 1080 × 1920 canvas |
| Upload rejected for file size | File over 300 MB | Lower bitrate to fit the budget for the clip's length, or shorten the clip |
| Upload rejected for format | Container or codec outside MP4 or MOV with H.264 or HEVC | Re-export as MP4 with H.264 |
| Soft or blocky picture | Resolution under 720 px or heavy compression | Export at 1080 × 1920 px with a bitrate inside the size budget |
| Audio drifts out of sync | Variable frame rate | Export at a constant 30 FPS with AAC audio |
| Lower reach than expected | Duration over 3 minutes | Publish a shorter cut of 3 minutes or less |
One-day fix or a re-edit: black bars, format and size rejections, soft picture, and audio drift usually point to export settings. Captions outside the safe zone, lower thirds that need retiming, and cuts that run too long require changes in the edit.
If reach is the concern, check duration before adjusting bitrate. A clean export over three minutes can still fall outside the format's discovery threshold. For a longer cut, see this guide to posting longer videos on Instagram.
The repair depends on where the fault sits. A wrong codec or frame rate calls for a new export; misplaced text or an overlong cut means reopening the timeline and checking the revised edit. Keep one master per Reel and use a consistent export preset to reduce repeat mistakes.
SleekPost schedules and publishes Reels, videos, carousels, and text posts to Instagram and nine other platforms from one dashboard, using the networks' official APIs. Queue a week of Reels or set recurring posts. Start with the 7-day free trial at SleekPost and schedule your next batch.